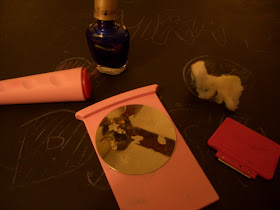
All right. First up, the supplies.
So that weird conical thing on the left is the stamp. The smaller end off to the side is green and it's for teensier designs. I like the full-nail designs best so I've only used the big red end so far. They're both just rubbery stamps... Anyway, down center is the little holder thing and the image plate. The holder is supposed to keep it in place, but I'm not sure if it really does that much. The red thing down right is the scraper, which gets rid of the flood of nail polish that you'll see later. Up above you have my handy-dandy acetone-coated cotton ball, and then you've got my stamping nail polish up top.
Just thought I'd show you the polish I used as a base, Sally Hansen Xtreme Wear Green With Envy.
And then here's the image plate after I've drowned it in nail polish.
Then you use your handy-dandy scraper to get rid of all the extra junk.
Then you roll your stamp across the image so that you pick it up.
Voila! Magnifique, no?
So it's really pretty simple. Trust me. Anyway, I've still got stuff to do so I'll be off.
I feel guilty about leaving without hardly writing anything. Hopefully today's post was helpful to make up for it?
Hey, I have an idea! Why don't you comment me about it? Was my tutorial good? What could I do better? TELL ME.
LUV YA,
- Laura


I highly adore this fern pattern C:
ReplyDeleteI think that your tutorial was very helpful!
ReplyDeleteand now if I were to ever attempt to do that I would know how! :)